Gentle intro to GPUs for backend developers. Part 1
Intro
These days there’s an increasing demand for applications like AI, image processing, and content recommendations which can greatly benefit from leveraging compute resources of modern GPUs on the backend. However, historically, backend engineers with a primary background in services haven’t had much interaction with GPUs, except for small groups.
Investing time and resources into learning how to efficiently use GPUs is absolutely rewarding and is indeed worth pursuing.
In this series of articles, I would like to offer a gentle and popular introduction to GPU programming specifically tailored for engineers. Whether you’re new to GPU programming or simply want to expand your knowledge, we’ve got you covered. I’ll explain the fundamentals of GPU programming in a way that’s easy to grasp if you’re more accustomed to working with backend services.
In practice, if you have to start using GPUs for computations in backend services today, you would likely end up with one of the following options:
- A high-level abstraction like PyTorch which already offers you a lot of flexibility and is very easy to use on popular hardware. If you are using Python, this is probably the best option to start with.
- A custom C/C++ server running a CUDA program or its alternatives in it. If you need more flexibility and control over resources the option above can offer – you would likely need to write your own low-level code. Other motivation for this option could be a requirement to run code on edge or using custom hardware.
An alternative and more exotic option would be to use Rust with WGPU. If you use Rust, or need to run your code on a variety of client devices, you can try WGPU which provides better compatibility and runs on a lot of devices and Web and should be relatively easy to combine with popular server libraries like gRPC.
In Part 1, I want to start from a high-level introduction into GPU compute landscape and then in the next part I will try to give a more practical overview of how to use GPUs in your backend services and combine GPU program with one of the popular server libraries. I will use Rust and WGPU for my examples. Please keep in mind that examples in this article are simplified for illustration purposes and are not meant to be used in production.
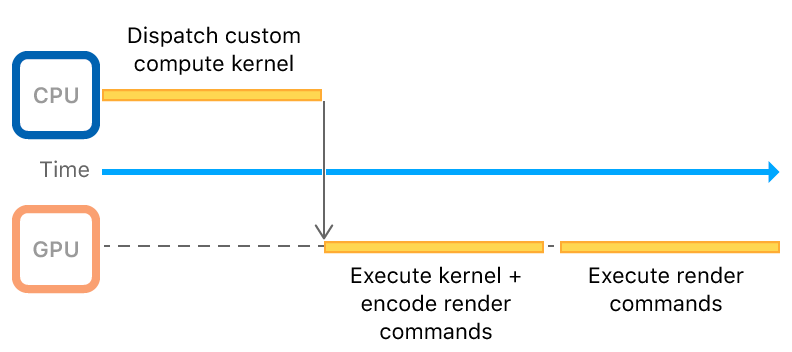 Illustration of a compute workflow. Apple.com
Crunching numbers on CPU
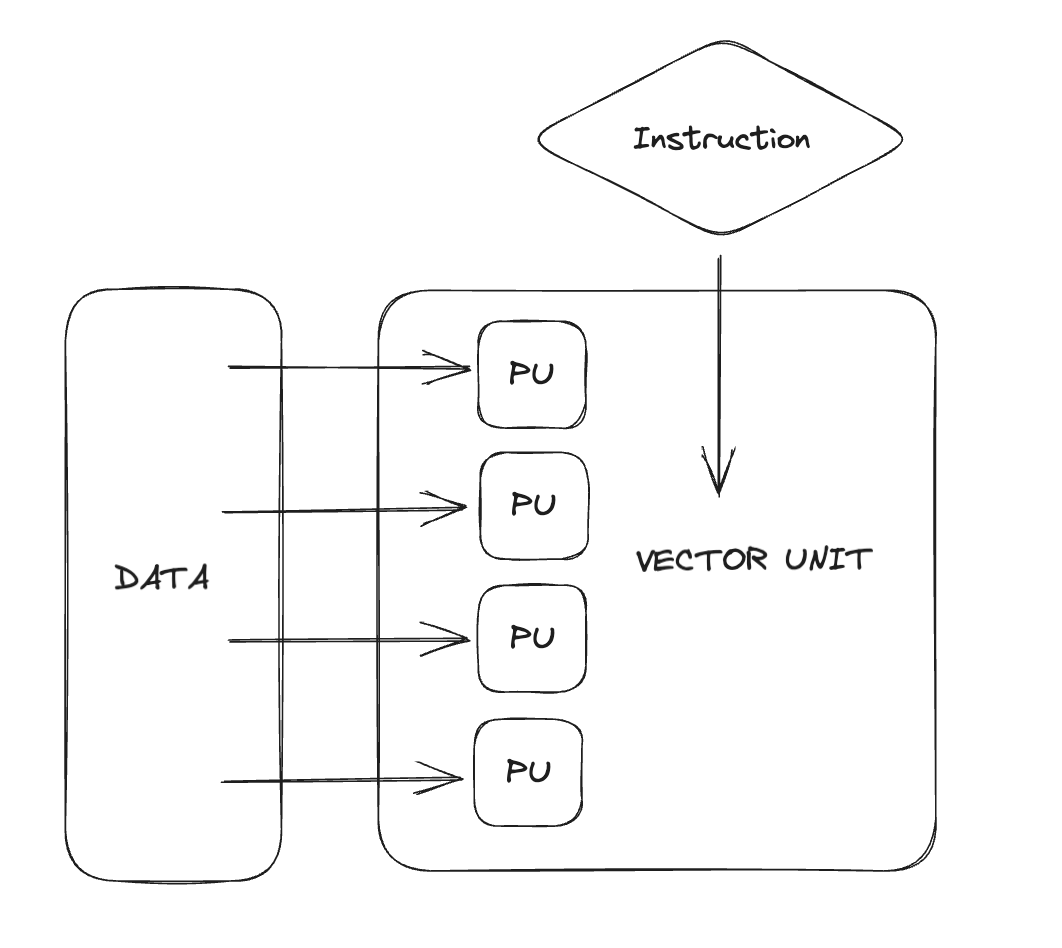
These days, there are mainly two methods we can use when dealing with many number-based calculations: SIMD operations (Single Instruction Multiple Data, e.g. AVX512/NEON/etc) and GPUs. Simply put, a GPU is a massively-parallel SIMD machine, making it very efficient. The sections within the GPU, known as warps and wave-fronts, function like large SIMD registers. Before we get into the details of leverage GPUs for these calculations, let’s first understand what CPUs can do in this regard.
The first computers capable of SIMD operations were developed in the 1960s, but it wasn’t until the 1990s that this capability became available to consumers. This came with the introduction of the MMX instruction set, designed for multimedia tasks. SIMD operations exploits the idea that your program contain pockets of instruction-level parallelism. For those coding in C/C++ or Rust, experimenting with SIMD is straightforward. However, if you’re working outside these languages, finding good options for writing SIMD code may be more challenging. This is largely due to the need for direct control over memory layout and alignment, something many managed languages aren’t well-equipped to handle. That said, some compilers for managed languages might offer basic vectorization options. A typical solution for languages like Python would be to offload batches of SIMD-accelerated computations to a native library like numpy. Along with instruction set manuals, I’d recommend to watch Mike Acton’s and Scott Meyers’ and talks as a helpful starting point on this topic.
Today if you want to leverage SIMD operations, you generally have two options in practice. You can use a math an existing library like numpy or liboil, which have already incorporated it for common cases (such as math). Or, you can write your own code using features known as ‘compiler’s intrinsics’. Alternatively you can use a specialized compiler like ispc.
However, in many instances, you don’t even have to write code that’s specific to the CPU. If you organize your code and data in a particular way, the compiler can figure out the best way to use SIMD instructions. While there are many subtle details, a good guideline is to keep your code simple, organize data by type, and avoid adding unnecessary levels of indirections. Furthermore, if you’re working specifically with Apple’s processors, it would be useful to learn more about the AMX co-processor.
Here is a simple Rust illustration of using NEON supported by Apple Silicon to multiple two 4x4 matrices. Matmul is a popular operation in machine learning and many other applications.
use std::arch::aarch64::*; // Use ARM neon intrinsics.
const N: usize = 4;
type Matrix = [[f32; N]; N];
// Row-major order.
const test_a: Matrix = [[1.0,  2.0,  3.0,  4.0 ],
                        [5.0,  6.0,  7.0,  8.0 ],
                        [9.0,  10.0, 11.0, 12.0],
                        [13.0, 14.0, 15.0, 16.0]];
// Column-major order.
const test_b: Matrix = [[1.0,  5.0,  9.0,  13.0],
                        [2.0,  6.0,  10.0, 14.0],
                        [3.0,  7.0,  11.0, 15.0],
                        [4.0,  8.0,  12.0, 16.0]];

fn multiple_simd(a: &Matrix, b: &Matrix, c: &mut Matrix) {
    unsafe {
        for i in 0..N {
            // Load a row-vector from A.
            let a_v = vld1q_f32(&a[i][0]);

            for j in 0..N {
                // Load a column-vector from B.
                let b_v = vld1q_f32(&b[j][0]);
                // Multiply.
                let r_v = vmulq_f32(a_v, b_v);
                let mut r = [0.0; 4];
                // Store the result.
                vst1q_f32(&mut r[0], r_v);
                // Update the result.
                c[i][j] = r.iter().sum::<f32>();
            }
        }
    }
}

fn main() {
    let mut c = [[0.0; N]; N];
    multiple_simd(&test_a, &test_b, &mut c);
    for row in &c {
        println!("{:?}", row);
    }
}
All you need to do is to compile this program and run it on a supported CPU!
cargo run --release
...
[90.0,  100.0, 110.0, 120.0]
[202.0, 228.0, 254.0, 280.0]
[314.0, 356.0, 398.0, 440.0]
[426.0, 484.0, 542.0, 600.0]
As mentioned above, please keep in mind that while this program uses Neon operations for multiplying 4x4 matrics to perform four operations on f32 numbers at a time, in practice, especially for larger matrices, cache optimization via blocking will ultimately be more important. Because SIMD code on CPU is so much easier to work with, it’s often a good idea to start with an optimized SIMD program and then move to GPU if you need more performance. As you will see below, the GPU program will require writing quite a lot of ceremony code compared to the SIMD example above.
Overview of GPU Compute Landscape
First of all. You may want to start with watching this high-level video overview of available options.
To put it more plainly, a top consumer-level CPU like the 7950 provides about a tenth of the f32 computation capacity compared to a high-end consumer GPU like the 4090 when executing highly optimized code. This ratio generally stays the same when comparing professional-grade CPUs and GPUs. However, professional GPUs tend to have significantly more memory. Moreover, you can fit more professional-grade GPUs in a single server machine. In terms of their design, GPUs are made to handle large amounts of data rather than focusing on low latency, which must be an important consideration when designing a GPU-based system – dispatching workload on GPU or having GPU access data in VRAM is not free. In other words, you need to make sure that the GPU is busy enough to justify the cost of moving data to and from the GPU. If you are looking to learn more about nuances in GPU, I recommend this amazing series of articles: A trip through the Graphics Pipeline 2011.
When it comes to GPU-based methods, you usually have two main choices today: Vulkan and CUDA. It’s worth noting, however, that there are counterparts in other operating systems: DX12 is quite similar but is confined to the Windows ecosystem, while Metal is akin but exclusive to Apple’s ecosystem. Older APIs like OpenGL and OpenCL, and older versions of DirectX are less relevant today. You may still find them supported in some frameworks, but they are not recommended for new projects. The key distinction between older APIs like DX11/OpenGL and the modern ones is how they handle workloads. Older APIs were not effectively designed for multi-threaded tasks and they delegate many significant low-level details to the driver. The more modern APIs, on the other hand, provide more control and efficiency for such workloads.
If you’re looking to explore beyond the mainstream options, there are some more GPU APIs available. For example, Apple provides MPS, which is relevant if you’re interested in performing calculations on a Mac or an iPhone/iPad. AMD also offers their new API – ROCM. It’s growing in popularity, although I’ve not seen it used much in real-world applications yet. Another choice is WebGPU, a user-friendly API similar to Vulkan. Despite the “Web” in its name, you can use it in regular applications without any web-based technology. However, please note that WebGPU only reached its stable 1.0 version version a few months ago, so there aren’t many resources, tools, or production-ready examples available yet. WebGPU programs can run either natively or inside a browser, allowing you to transfer computations to client-side. In many ways, it’s very similar to Vulkan but with simpler resource management, making it more like Metal. One of WebGPU’s advantages is that it works on all modern GPUs, unlike the other options mentioned above. However, it’s less mature than other choices, it adds layers of abstraction, and it generally doesn’t offer as much control. If you are interested in analysis of what each API offers in context of computer graphics, you can check this article. Remember, all cross-platform APIs often have many optional settings. Plus, they need different methods to run efficiently on different types of hardware.
If we are talking about Vulkan and CUDA, they are quite similar in terms of performance and capabilities. There are even some popular libraries like VkFTT) or mentioned above PyTorch which can target both CUDA and Vulkan backends sometimes providing similar performance. Nevertheless, CUDA is a lot more popular in practice for research and industrial applications like AI or science, and Vulkan is more popular for computer graphics and media in general (like video encoding or color image processing). At the high-level, they look more or less the same, but CUDA is more friendly and somewhat more high-level. CUDA also ships with a lot of ready-to-use hand-optimized code for specific tasks. Tools for CUDA are also generally more mature, however tools for profiling and analyzing applications using other APIs are slowly converging with what CUDA offers.
Basic anatomy of a GPU program
The anatomy of a program which uses GPU for crunching numbers straightforward at high-level: you have a CPU program which creates connection with GPU device, the connection is used to send data and commands to GPU and get the results back. The commands in this case will invoke small programs on GPU side responsible for handling your data in parallel. The CPU program can use different primitives like fences and semaphores letting GPU driver singal your CPU program back when something is done. At the high-level it looks similar to client/server communication. Here, instead of http client you have a GPU queue where you write commands. GPU decodes those commands and dispatches them on it’s devices asynchronously. Driver and GPU firmware are typically responsible for that. Commands could be one of few types - 1) resource management - create/destroy queues, sync primitives, buffers, GPU programs, etc, 2) simple blit commands – copy/transfer or fill data. 3) commands to dispatch programs.

In case of Vulkan you write all of this yourself and the API gives you maximum flexibility. On the other hand, CUDA abstracts a lot of these steps allowing to focus more on actual computation part and no on communication with GPU. There are pros and cons, but for simple number crunching like ML in 99% you would prefer CUDA (example). Comparing to CUDA, Vulkan example is a bit more verbose.
After you’ve written a CPU program, the next step is to write a program for the GPU, often referred to as a kernel or shader. Due to the design of GPUs, the programs you can run on them are somewhat limited. Usually, you can only perform math-related code. For instance, they don’t have common operating system features, stacks, or regular pointers, although CUDA and recent versions of Vulkan do have pointers. This might sound confusing, but in practice, you can manage by using regular array indices. Also, GPU’s computing units don’t have devices like branch predictors because they’re built for handling large amounts of data. As a result, ‘branching’ in GPU code can be more costly than in CPU code.
When we look at its structure, your GPU program usually gets an ID (like a current i,j index in matrix multiplication) and calculates a result based on this. Your CPU program usually dispatches a grid MxNxK of “GPU threads”. Each of these threads runs a small program to do a bit of the calculations. These “GPU threads” can also be grouped into ‘workgroups’, which can communicate and share memory on the GPU. Shared memory is cheaper for threads in the same group to access and can be used for coordination. Understanding this can help you use the hardware better and is often the key to getting the most performance. Here’s a good example of how shared memory can be used, like in for image reduction.
When it comes to GPU code, with CUDA, you’ll have something very similar to C++ for both CPU and GPU code. This is all tied together with a custom LLVM-based toolchain. With Vulkan, you write the CPU program in C/C++ using an open-source header that contains all the API function declarations and types. For a Vulkan program to run, the GPU driver on your system must support the APIs you’re using. You can query the driver to see available resources, limits, and supported API versions. In Vulkan, the GPU program must be compiled into SPIR-V (essentially, GPU assembly) bytecode. You can write the program using a language like GLSL, HLSL, or something more recent like WGSL. These languages (except WGSL) are similar to C with a few minor differences. Because all GPUs have their unique architecture and microcode, the SPIR-V bytecode will be compiled to native GPU code by a driver that targets your specific GPU model.
Example with Rust and WPGU
To finish the first part in this series, let’s write a toy GPU program which will do exactly the same thing as our SIMD program, but on a GPU. For now, let’s not worry too much about the performance and focus on correctness and simplicity first.

In simpler terms, the general procedure is that you first launch your CPU program, allocate all the necessary resources, and then write your matrices into either a single buffer or multiple ones. When it comes to providing resources (data) to your GPU programs, there are different binding models available in different APIs. diving deep into terminologies at this point, you need to know that these resources for your GPU programs are connected using “bind groups”. After you allocate them, you need to encode and send commands to execute the multiplication. When a matrix changes, you’ll need to rewrite the updated version and send it back to the GPU. It’s crucial to minimize interaction and data transfer between the GPU and CPU as much as possible, preparing as much data as you can upfront. Another key point is that modifying data during runtime is usually not recommended as it may defeat the benefits of using GPU in the first place. Your main database, where your matrices and vectors are stored, should already encode them in the exact format as they would be used on the GPU, or at least in the format that cheap to transform into GPU friendly representation. Storing these matrices and vectors in a different format like CSV or JSON, and then having the CPU convert them to a byte array properly aligned for the GPU (like std140) at query time could lead to significant performance drops in real-world situations.
For our example, we will be using WGPU – portable GPU abstraction on top of modern APIs. To start we need a couple of things in addition to WGPU:
[package]
name = "grpc-gpu"
version = "0.1.0"
edition = "2021"

[dependencies]
wgpu = "0.16.2"
pollster = "0.3.0"
bytemuck = "1.13.1"
Pollster is a small utility library allowing to await for futures. We would need it since WGPU uses async methods. Another dependency – bytemuck is a library for converting Rust structs to byte arrays. We will use it to convert our matrices to byte arrays.
For convenience let’s implement a small Matrix type on top of Rust’s vectors:
const N: usize = 4;

struct Matrix {
    pub data: Vec<f32>,
}

impl Matrix {
    pub fn new(data: [[f32; N]; N]) -> Self {
        Self { data: data.iter().flatten().copied().collect() }
    }
    pub fn null() -> Self {
        Self { data: vec![0.0; N * N] }
    }
    pub fn print(&self) -> () {
        for i in 0..N {
            println!("{:?}", &self.data[(i * N)..((i + 1) * N)]);
        }
    }
}
Here is how we are going to invoke our GPU implementation:
fn main() {
    let a = Matrix::new([
        [1.0,  2.0,  3.0,  4.0 ],
        [5.0,  6.0,  7.0,  8.0 ],
        [9.0,  10.0, 11.0, 12.0],
        [13.0, 14.0, 15.0, 16.0],
    ]);
    let b = Matrix::new([
        [1.0,  2.0,  3.0,  4.0 ],
        [5.0,  6.0,  7.0,  8.0 ],
        [9.0,  10.0, 11.0, 12.0],
        [13.0, 14.0, 15.0, 16.0],
    ]);
    let mut c = Matrix::null();
    pollster::block_on(gpu_multiply(&a, &b, &mut c));
    c.print();
}
Now let’s write CPU part of the program (see comments for details on what’s going on):
async fn gpu_multiply(a: &Matrix, b: &Matrix, c: &mut Matrix) {
    // Instance contains driver related state for our application.
    let instance = wgpu::Instance::new(wgpu::InstanceDescriptor {
        backends: wgpu::Backends::METAL,
        ..Default::default()
    });
    // Adapter is our "client" holding a connection to GPU.
    let adapter = instance
        .request_adapter(&wgpu::RequestAdapterOptions::default())
        .await
        .expect("Failed to request adapter");
    let (device, queue) = adapter
        .request_device(
            &wgpu::DeviceDescriptor {
                label: Some("GPU example device"),
                features: wgpu::Features::empty(),
                limits: wgpu::Limits::downlevel_defaults(),
            }, None)
        .await
        .expect("Failed to request adapter");

    // Create a "GPU program" module.
    // Here we just inline our shader code into function agrument.
    let shader_module = device.create_shader_module(wgpu::ShaderModuleDescriptor {
        label: Some("GPU compute shader"),
        source: wgpu::ShaderSource::Wgsl(include_str!("shader.wgsl").into()),
    });

    // Allocate GPU 3 buffers to store our matrices.
    // All three matrices will be used on gpu as a "storages".
    // Each buffer should be created with specific usage flags.
    // Since we don't need to copy matrics C from CPU to GPU,
    // we don't need wgpu::BufferUsages::COPY_DST bit for it.

    let matrix_a_buffer = device.create_buffer_init(&wgpu::util::BufferInitDescriptor {
        label: Some("Matrix A buffer"),
        contents: bytemuck::cast_slice(&a.data),
        usage: wgpu::BufferUsages::STORAGE
             | wgpu::BufferUsages::COPY_DST
             | wgpu::BufferUsages::COPY_SRC,
    });
    let matrix_b_buffer = device.create_buffer_init(&wgpu::util::BufferInitDescriptor {
        label: Some("Matrix B buffer"),
        contents: bytemuck::cast_slice(&b.data),
        usage: wgpu::BufferUsages::STORAGE
            | wgpu::BufferUsages::COPY_DST
            | wgpu::BufferUsages::COPY_SRC,
    });
    let matrix_c_buffer = device.create_buffer_init(&wgpu::util::BufferInitDescriptor {
        label: Some("Matrix C buffer"),
        contents: bytemuck::cast_slice(&c.data),
        usage: wgpu::BufferUsages::STORAGE
            | wgpu::BufferUsages::COPY_SRC
    });

    // Create staging buffer to read back the result from GPU.
    let staging_buffer_size = (std::mem::size_of::<f32>() * N * N) as wgpu::BufferAddress;
    let staging_buffer = device.create_buffer(&wgpu::BufferDescriptor {
        label: Some("Staging buffer"),
        size: staging_buffer_size,
        usage: wgpu::BufferUsages::MAP_READ | wgpu::BufferUsages::COPY_DST,
        mapped_at_creation: false,
    });

    // Create a pipeline to run our program on GPU.
    let pipeline = device.create_compute_pipeline(&wgpu::ComputePipelineDescriptor {
        label: Some("Matrix multiply pipeline"),
        layout: None,
        module: &shader_module,
        entry_point: "main",
    });

    // Create a bind group to pass our matrices to GPU.
    // This should match the layout of our WGSL shader.
    let bind_group_layout = pipeline.get_bind_group_layout(0);
    let bind_group = device.create_bind_group(&wgpu::BindGroupDescriptor {
        label: None,
        layout: &bind_group_layout,
        entries: &[
            wgpu::BindGroupEntry {binding: 0, resource: matrix_a_buffer.as_entire_binding()},
            wgpu::BindGroupEntry {binding: 1, resource: matrix_b_buffer.as_entire_binding()},
            wgpu::BindGroupEntry {binding: 2, resource: matrix_c_buffer.as_entire_binding()},

    // Encode dispatch command to GPU.
    let mut encoder =
        device.create_command_encoder(&wgpu::CommandEncoderDescriptor { label: None });
    {
        let mut cpass = encoder.begin_compute_pass(&wgpu::ComputePassDescriptor { label: None });
        cpass.set_pipeline(&pipeline);
        cpass.set_bind_group(0, &bind_group, &[]);
        cpass.insert_debug_marker("Multiply matrices");
        cpass.dispatch_workgroups(1, 1, 1);
    }
    encoder.copy_buffer_to_buffer(&matrix_c_buffer, 0, &staging_buffer, 0, staging_buffer_size);
    queue.submit(Some(encoder.finish()));

    // Read back the result from GPU.
    let buffer_slice = staging_buffer.slice(..);
    let (tx, rx) = std::sync::mpsc::channel();
    buffer_slice.map_async(wgpu::MapMode::Read, move |v| tx.send(v).unwrap());

    // Wait for the result to be ready.
    device.poll(wgpu::Maintain::Wait);

    // Receive the result from GPU.
    let res = if let Ok(Ok(())) = rx.recv() {
        let data = buffer_slice.get_mapped_range();
        let result: Vec<f32> = bytemuck::cast_slice(&data).to_vec();
        drop(data);
        staging_buffer.unmap();
        Some(result)
    } else {
        panic!("Failed to receive data from GPU");
    };

    c.data = res.unwrap();
}
Now let’s write GPU part of the program (“shader.wgsl”):
// Matrix struct must match the one in Rust code.
struct Matrix {
    data: array<f32>,
};

// Inputs to our program.
@group(0) @binding(0) var<storage>        matrix_a:  Matrix;
@group(0) @binding(1) var<storage>        matrix_b:  Matrix;
@group(0) @binding(2) var<storage, write> matrix_c:  Matrix;

// Entry point of our program.
// Each workgroup will calculate 4x4 elements of matrix C.
@compute
@workgroup_size(4, 4)
fn main(@builtin(global_invocation_id) id: vec3<u32>) {
    var sum: f32 = 0.0;
    for (var i = 0u; i < 4u; i = i + 1u) {
        let a_i: u32 = i + id.x * 4u;
        let b_i: u32 = id.y + i * 4u;
        let a_elem = matrix_a.data[a_i];
        let b_elem = matrix_b.data[b_i];
        sum = sum + a_elem * b_elem;
    }
    let c_i: u32 = id.x * 4u + id.y;
    matrix_c.data[c_i] = sum;
}
Unscientific benchmark
You can find a slightly modified version of the code above in this GitHub repo. The program compares time of executing matrix multiplication on CPU using single core and GPU without any optimizations. The numbers I got on my M1 Mac for 1024x1024 input size without taking into account GPU setup and data transfer are:
CPU: 3.9s
GPU: 42.5ms
Conclusion
That concludes our introduction for now. We’ve touched upon the fundamentals of GPUs, their unique structure, and tried to write a simple GPU-accelerated program. In the upcoming installment, we’ll pivot towards real-world applications, delving into how to seamlessly integrate your GPU-accelerated programs with other components of your backend service.